30 January 2013

Cinnamon Buns

 
A few weekends ago when the weather got colder and one of my New Year's resolutions had worn off, I had a serious craving for comfort food, so I made my favourite cinnamon buns. Served straight out of the oven and drizzled liberally with a sweet sticky icing, they are the ultimate in comfort food.

They do take a while but they really are worth every decadent bite, the time isn't in cooking or preparing, it's in proofing and raising. So they are a perfect weekend treat.

Cinnamon Buns

for the dough

  • 2 teaspoons dried yeast
  • 1/2 cup warm water
  • 1/2 cup hot milk
  • 1/4 cup sugar
  • 1/3 cup butter
  • 1 teaspoon salt
  • 1 egg
  • 3 and 3/4 cup flour
for the filling
  • 3/4 cup brown sugar
  • 1/2 cup melted butter
  • 2 tablespoons cinnamon
for the icing
  • 60 grams butter, softened
  • 2 cups icing sugar
  • 1 teaspoon vanilla essence
  • 60 to 90 mls boiling water

Method

1.   Mix the yeast with the warm water and a pinch of sugar, let sit for 5 minutes until it bubbles up. Mix milk, sugar, butter, salt and egg. Add to 3 cups of flour and mix well, knead until soft and elastic, add more flour if the dough is sticky. Rest in a buttered bowl in a warm place for an hour and a half until doubled in size.


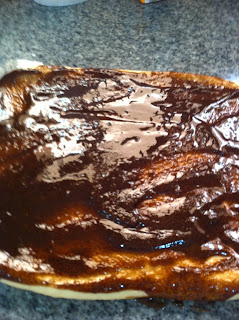
2.   Punch down, and then roll into a rough 40cm by 25cm rectangle. Mix the melted butter, sugar and cinnamon and spread on the dough.


3.   Beginning with the long side, roll the dough up, don't worry if it gets messy. Cut the roll into 12 to 15 pieces and lie flat side in a baking dish. Leave in a warm place to rise for 30 minutes. 


4.   Bake at 180 degrees celsius (350 degrees fahrenheit) for about 30 minutes until cooked. Try not to pick a piece off to taste (as I did). Doesn't look pretty right, wait until you add the icing!


5.   Make the glaze, mix the butter with the icing sugar and vanilla essence and add 3 tablespoons boiling water. Stir to combine. Add more water, 1 tablespoon at a time until icing is a pouring consistency. Drizzle onto the hot buns in the pan.


6.   Remove the buns from the pan and scoff warm - the remainder will keep for 2 days, and are best eaten warmed.

26 January 2013

Mango and Passionfruit Pavlova


Happy Australia Day!

I'm off to an Australia Day barbie today, and looking forward to burgers loaded with beetroot, pineapple, bacon and egg - just like dad used to make. I'm not Australian! I'm a Kiwi! no not the fruit, nor the bird, but a born and bred New Zealander, and NZ's closest neighbours are Australians. We often argue, make bad jokes about each other and strive to beat each other on the sports field, but put us 14,611 kilometres away from home and we're best of friends. We share the same values, we think the same way, and by and large we eat the same food.

There are always discussions about whether Australia or New Zealand created the first Pavlova, regardless of where it came from, it is a dessert enjoyed by both Ozzies and Kiwis alike.

When I asked my favourite Australian sheila what I could bring to the barbie, there was no hesitation. PAV! she said, and I grinned...I love making a good Pav.

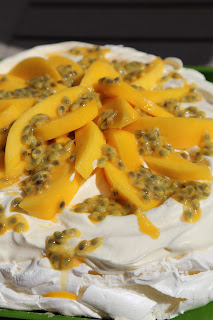
For those that haven't experienced the joy of a Pavlova, it is a meringue based dessert, crunchy and crispy on the outside and soft and marshmallowy in the middle and smothered in whipped cream and fruit of your choice. Strawberries are always a favourite, passion fruit are a nice touch, and in this case mangoes are a lovely option. I've saved my favourite fruit for last so that I can clarify a popular misnomer - the fruit is kiwifruit, k-i-w-i-F-R-U-I-T! did you get the emphasis on fruit, regardless of how they are labelled on your supermarket shelf, they are not KIWI's! A kiwi is a New Zealand flightless bird, that only exists in NZ and is one of our national icons. We can call ourselves Kiwis as a friendly colloquial term to emphasise our affinity with our home country, but we do not call kiwifruit Kiwis, unless they lay big fat eggs, run around in the dark, and squawk. Rant over.

Enjoy your Pav!

Pavlova

  • 6 egg whites
  • 1 1/4 cup caster sugar
  • 1 tablespoon cornflour
  • 1 teaspoon vanilla essence
  • 1 teaspoon white vinegar
  • 250 mls whipping cream
  • 2 teaspoons caster sugar
  • 1 teaspoon vanilla essence extra
  • 1 very ripe mango, sliced
  • pulp of 3 large passion fruit

Method

1.  Line a baking sheet with baking paper, mark out a 20cm circle on the paper. Turn the paper over so the pen or pencil doesn't get onto the meringue. Heat the oven to 100 degrees Celsius (200 degrees Fahrenheit).

2.  Whisk the egg whites until soft peaks form. Add in the caster sugar one spoon at a time. whisking well in between to dissolve the sugar. The final mixture shouldn't be gritty, if it is, beat until it is smooth. Add the cornflour, vinegar and vanilla essence and whisk to combine.


3.  Spread the meringue evenly on the baking paper to the edges of the circle. Fluff up the top to form peaks (these will crisp up).


4.  Bake for 1 1/2 to 2 hours until the meringue is crisp and not moist to touch. If the meringue starts to brown, turn the oven down to 80 degrees. Turn the oven off, leave the door ajar, and leave the Pavlova in the oven until the oven is cold.


5.  Beat the cream with the sugar and vanilla essence until soft peaks form. Spread onto the Pavlova and top with fruit of your choice.